 |
| Jessa's Oven/Grill Mitt |
While she desired a long mitt, I desired a mitt that would fit a larger hand. Together we created a long mitt to protect the forearm and a larger mitt to accommodate a bigger hand. The pattern we designed is available in the Linda B Creative Facebook Group in the "Files" section. On Facebook, search Linda B Creative and ask to join. This pattern is for personal use only. Contact Linda on her website, LindaBrattenCreations.com to use this pattern as a class or as a lesson plan.
Be sure to print it at 100% or actual size instead of fit to page.
Then cut it out on the solid line and tape the 8 1/2" side of a standard piece of printer paper to the edge with the red solid line.
This will be the pattern for the extra long mitt. If you need more width, cut down the center of the pattern and tape in a piece of paper cut to the additional required width.
To create this mitt you will need:
- The above mentioned pattern
- A sewing machine in working order
- While a standard presser foot can complete the project, we used a walking foot, a 1/4" patchwork foot, and an Edge-joining presser foot.
- Construction Thread and Thread that matches the Binding
- 2 pieces of Insul-Bright or heat resistant batting 20" x 11 1/2" each
- 2 pieces of 100% Quilter's Cotton for the lining 20" x 11 1/2" each
- 2 pieces of Cotton Duck Upholstery Fabric 20" x 11 1/2" each
- 5" piece of 1/2" grosgrain ribbon
- 2 1/2" x 40" Piece of Quilter's Cotton for the Binding, we used the same fabric as the lining for this.
- Basic sewing supplies
Now place your two pieces of 100% Quilter's cotton on top the Insul-Bright. Place the lining pieces right sides together.
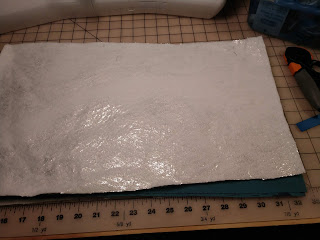
Next place a second layer of Insul-Bright on top of the lining fabric. Place the metallic side so it is facing up .
Finally layer both of the outside cotton duck fabric with the right sides together on top of the last layer of Insul-Bright.
Now place the paper pattern on top of all the layers.
Feel free to use pattern weights or pins to hold the pattern in place.
Using a rotary cutter or a pair of shears cut through all layers, be careful not to shift the layers.
If needed trim the excess fabric away in small sections.
Use fabric clips or pins to hold the layers together and take the layers to the sewing machine.
We use a walking foot to help us maneuver through all the layers of the mitt. We used basic polyester construction thread with a stitch length of 2-2 1/2", and a 1/2" seam allowance around all the edges of the mitt, leaving unsewn the short 8 1/2" edge where you will insert your hand.
We also used a needle down position to help us pivot around the mitt.
 |
| So far, so good! |
Also clip into the sharp turns around the thumb areas.
Then take the top layer of the cotton duck and separate the two layers of duck. Turn the outside top layer of the duck to the back side of the Insul-Bright.
That is the only layer that needs to be turned to the outside and the mitt should have both of the right sides of the cotton duck on the outside of the mitt. Use a dull point to smooth out the edges after you turn the mitt.
Next cut a piece of grosgrain ribbon that is 5" long to create a hanger for the mitt.
Then cut a piece of lining fabric that is 2 1/2" x 40" long. Fold this piece in half, with the wrong sides together down the long side of the fabric and press.
On one short end fold it into the wrong side of the binding 1/2" and press, to create a finished edge.
Next pin the ribbon on the seamed edge opposite of the thumb. The ribbon should be on the outside of the mitt with raw edges matching.
Pin or clip the binding to the inside of the mitt, start with the finished pressed edge and match the raw edges of the binding and the mitt together.
Next using a 1/4" patchwork presser foot, and a 1/4" seam allowance, begin to attach the binding to the mitt. Be sure to leave about 3" of the binding with the finished edge unsewn so you will be able to trim and tuck the unfinished edge inside it and sew it shut by machine.
Finally, use an Edge-joining presser foot on your machine. Select a decorative stitch and matching thread to sew the folded edge of the binding to the outside of the mitt. Pull the folded edge of the binding over the line of stitching that attached the binding. Place the center guide bar of the Edge-joining presser foot, on the folded edge of the binding to keep the decorative stitches in place. Place the inside of the mitt on the free arm of the sewing machine and slowly and steadily stitch down the binding.
Secure the stitches when you reach the start of your decorative stitches.
Now you are ready to enjoy your Summer and baking plans with your new Oven/Grill Mitt! Thanks Jessa, for assisting me in this fun and easy project!
.
Looking forward to more grilling this Summer, Linda


