Sunday, November 4, 2018

Some Faux Batik Fun at the Rooster Creek Quilt Guild Retreat

I was honored to be able to share my mixed media, Mixing It Up-Faux Batik Tote Bags, at the Rooster Creek Quilt Guild September Retreat.


It was great fun to get them started with the resist. Then we were able to add the color to our fabric panels!


Once the paint was set, they set off creating their own unique tote.


Check out this promotional video that will hopefully inspire you to look into hosting this workshop at your guild or local quilt shop.


It was a great weekend to spend with great quilters!

Linda Bratten
www.LindaBrattenCreations.com

Saturday, November 3, 2018

Hosting 52 Quilters for the Month of November, Art Quilters

I am so excited and honored to be hosting the month of November for the www.52Quilters.com.

It is focusing on Art Quilters and I am working with a great team!


I have posted my story on the blog and you can read about it here: http://www.52quilters.com/2018/11/welcome-to-world-of-art-quilters-for.html


Also check out their  52 Quilters Instagram account at: https://www.instagram.com/52quilters/


While you are there, be sure to follow my Instagram account for additional inspiration! Here is the link to my account: https://www.instagram.com/Linda_Bratten/


Sharing my love of art quilting with the world!- Linda

www.LindaBrattenCreations.com

Thursday, November 1, 2018

The Leaf and Curl Simple Border Free-Motion Quilting Design

I love the colors and shapes of Fall!  I often use them in the art quilts I create.  Today I am sharing a mini lesson on free-motion quilting on how to do my favorite small border design.


For those of you that have taken any of my free-motion quilting classes, including my Craftsy class,  Exploring Natural Machine-Quilting Motifs, you know that I use basic shapes to create my quilting motifs.

This is explained in detail in my online class, use this affiliate link to find out more about this class.

So using my "E and L" shapes and the "C and J" shapes you can create this quick and easy border.


Be sure to share what you create with this motif in my Facebook Group, Linda B Creative.


Not a member?  Search for Linda B Creative and ask to join!

And don't forget to sign up for my free newsletter, Linda B Creative! Use this link to join in the fun!


Enjoying the Season, Linda Bratten
www.LindaBrattenCreations.com

Thursday, May 31, 2018

How to make Jessa's Oven/Grill Mitt

Jessa's Oven/Grill Mitt
I have enjoyed sewing most of my life. I can honestly say that there is no greater joy than sharing what you know with someone new to the sewing and quilting craft.  When my daughter-in-law asked if we could make an oven mitt that was extra long to be used when she bakes bread, I jumped at the chance!  And as a bonus, she has agreed to share her adventure on my blog!

While she desired a long mitt, I desired a mitt that would fit a larger hand.  Together we created a long mitt to protect the forearm and a larger mitt to accommodate a bigger hand.  The pattern we designed is available in the Linda B Creative Facebook Group in the "Files" section. On Facebook, search Linda B Creative and ask to join.  This pattern is for personal use only. Contact Linda on her website, LindaBrattenCreations.com to use this pattern as a class or as a lesson plan.

Be sure to print it at 100% or actual size instead of fit to page.


Then cut it out on the solid line and tape the 8 1/2" side of a standard piece of printer paper to the edge with the red solid line.


This will be the pattern for the extra long mitt.  If you need more width, cut down the center of the pattern and tape in a piece of paper cut to the additional required width.

To create this mitt you will need:
  •  The above mentioned pattern
  • A sewing machine in working order
  • While a standard presser foot can complete the project, we used a walking foot, a 1/4" patchwork foot, and an Edge-joining presser foot.
  • Construction Thread and Thread that matches the Binding
  •  2 pieces of Insul-Bright or heat resistant batting 20" x 11 1/2" each
  • 2 pieces of 100% Quilter's Cotton for the lining 20" x 11 1/2" each
  • 2 pieces of Cotton Duck Upholstery Fabric 20" x 11 1/2" each
  • 5" piece of 1/2" grosgrain ribbon
  • 2 1/2" x 40" Piece of Quilter's Cotton for the Binding, we used the same fabric as the lining for this.
  • Basic sewing supplies
The secret to creating this mitt is in the correct layering.  Start with a piece of heat resistant batting. We used Insul-Bright.  Place a piece of Insul-Bright on the cutting mat with the shiny metallic side down on the cutting mat side. If you altered the pattern, all the fabric and batting will be 1- 1 1/2" larger.  Remember this size as all the rest of the layers will be cut to this size.


Now place your two pieces of 100% Quilter's cotton on top the Insul-Bright.  Place the lining pieces right sides together.

Next place a second layer of Insul-Bright on top of the lining fabric.  Place the metallic side so it is facing up .


Finally layer both of the outside cotton duck fabric with the right sides together on top of the last layer of Insul-Bright.  


Now place the paper pattern on top of all the layers.


Feel free to use pattern weights or pins to hold the pattern in place.


Using a rotary cutter or a pair of shears cut through all layers, be careful not to shift the layers.


If needed trim the excess fabric away in small sections.


Use fabric clips or pins to hold the layers together and take the layers to the sewing machine.


We use a walking foot to help us maneuver through all the layers of the mitt.  We used basic polyester construction thread with a stitch length of 2-2 1/2", and a 1/2" seam allowance around all the edges of the mitt, leaving unsewn the short 8 1/2" edge where you will insert your hand.


We also used a needle down position to help us pivot around the mitt.

So far, so good!
 Next use pinking shears to clip around the curved edges of the seam allowances close to, but not through the line of sitching.

Also clip into the sharp turns around the thumb areas.


Then take the top layer of the cotton duck and separate the two layers of duckTurn the outside top layer of the duck to the back  side of the Insul-Bright.  


That is the only layer that needs to be turned to the outside and the mitt should have both of the right sides of the cotton duck on the outside of the mitt. Use a dull point to smooth out the edges after you turn the mitt.


Next cut a piece of grosgrain ribbon that is 5" long to create a hanger for the mitt.


Then cut a piece of lining fabric that is 2 1/2" x 40" longFold this piece in half, with the wrong sides together down the long side of the fabric and press.


On one short end fold it into the wrong side of the binding 1/2" and press, to create a finished edge.

Next pin the ribbon on  the seamed edge opposite of the thumb.  The ribbon should be on the outside of the mitt with raw edges matching.


 Pin or clip the binding to the inside of the mitt, start with the finished pressed edge and match the raw edges of the binding and the mitt together.


Next using a 1/4" patchwork presser foot, and a 1/4" seam allowance, begin to attach the binding to the mitt. Be sure to leave about 3" of the binding with the finished edge unsewn so you will be able to trim and  tuck the unfinished edge inside it  and sew it shut by machine.


Finally, use an Edge-joining presser foot on your machine.  Select a decorative stitch and matching thread to sew the folded edge of the binding to the outside of the mitt. Pull the folded edge of the binding over the line of stitching that attached the binding. Place the center guide bar of the Edge-joining presser foot, on the folded edge of the binding to keep the decorative stitches in place.  Place the inside of the mitt on the free arm of the sewing machine and slowly and steadily stitch down the binding.

Secure the stitches when you reach the start of your decorative stitches.


Now you are ready to enjoy your Summer and baking plans with your new Oven/Grill Mitt!  Thanks Jessa, for assisting me in this fun and easy project!

.
Looking forward to more grilling this Summer, Linda


Friday, May 4, 2018

#MayThe4thBeWithYou

by Linda Bratten
Happy Stars Wars Day! 

I am sharing my Yoda Quilt that I made as a thread painting sample.  I used commercial fabric as a guide for me to thread paint Yoda.


Then I appliqued it to the background piece that I had machine embroidered his quote on.

Then I used black light thread in a lime green and bright yellow to create the light saber.


Finally using glow in the dark thread I used my domestic sewing machine to free-motion quilt it.

May you be inspired to do something creative today!-Linda

Monday, April 30, 2018

Spring Clean Your Studio Blog Hop 2018

I am excited to be a part of this great opportunity to get my studio back in shape after a fun filled first quarter of 2018.  A special thank you to Cheryl Sleboda of Muppin.com for arranging and organizing this event.  I really need some motivation and a deadline to bring some order to my creative chaos.

First let me introduce myself, I am Linda Bratten.  I am a quilt artist, instructor and pattern designer through my company, www.LindaBrattenCreations.com.  


My husband and I did a dramatic downsizing in our living space after the boys left home, so we could pursue our own interests.  I now face a huge downsizing dilemma, now that my sewing studio is smaller by half, what should I keep and what should I get rid of?  I should also mention that the past 10 years of teaching both nationally, locally and online has created a love of a variety of sewing machines and tools to get the best results, not to mention a fabric collection that I may never sew through.  However the storing of said items has presented its own problems, especially when the studio is relatively small.

So I created a list of things that I would love to get done by the deadline.


If you have ever had a small living/studio area you recognize that you can make a mess by leaving out a project. So now imagine creating three new patterns, organizing and presenting two guild programs, conducting an all day workshop, and maintaining my monthly teaching opportunities at a local quilt shop, all of which started the first week of January and ended on the last week in March!

I admit I am guilty of creating piles, and jumping to the next project to keep things moving.  I kept promising myself and the studio that I would get to it later, but it seems that "later" never comes without a deadline.  So here is what my work areas looked like before I dove in.

Piles of fabric and projects on my ironing station.
Threads piled high on my cutting station.
Inspiration Board Overload...

Finally, no place to sew at my sewing station.

Because of limited floor space, I have to used vertical space to store things,  and unfortunately there is not a closet door that I can shut to hide it. This may seem claustrophobic for some, but it is a sacrifice that I accepted when we downsized.  To get me started and to find a project that I could accomplish before the deadline, I started with my inspiration boards.

It is amazing what one finds when you go through several years of inspiring items.  I use these boards as inspiration, pattern planning, and part memory boards to keep me inspired.  Once the big clutter is gone/filed away they are surprisingly fun to look at!


Next I tackled the thread mess.  I took this opportunity to sort and reduce my thread supply.  I had just finished a thread sketching/painting workshop and so many of my threads were pulled out.

I reduced my thread boxes by half and was able to fit them on the shelving again!


Next I tackled the ironing station.  I took the sewing projects and sorted them into project bags and baskets that would keep items needed to finish them together.  Now to just find the time to get them finished.  Then I folded and sorted the fabric in piles.  I store my fabric in big totes in the garage based on fabric type and color.  Obviously there is no room for them in the studio.


This is the ironing station that my husband created for me.  He put a dresser on wheels and attached a large padded surface for me to iron on. I keep a piece of 100% cotton fabric on top of the padded surface.  The fabric protects the padded surface from spray starch products and fusible web.  When needed I wash or replace the fabric to keep it clean.  It is much easier than recovering the padded surface. I use a small basket to hold starch, pressing cloths, water bottles, and measuring tools that I use frequently.  The canvas container is holding camera equipment for when I film techniques or go "Live" in the Linda B Creative Facebook Group.

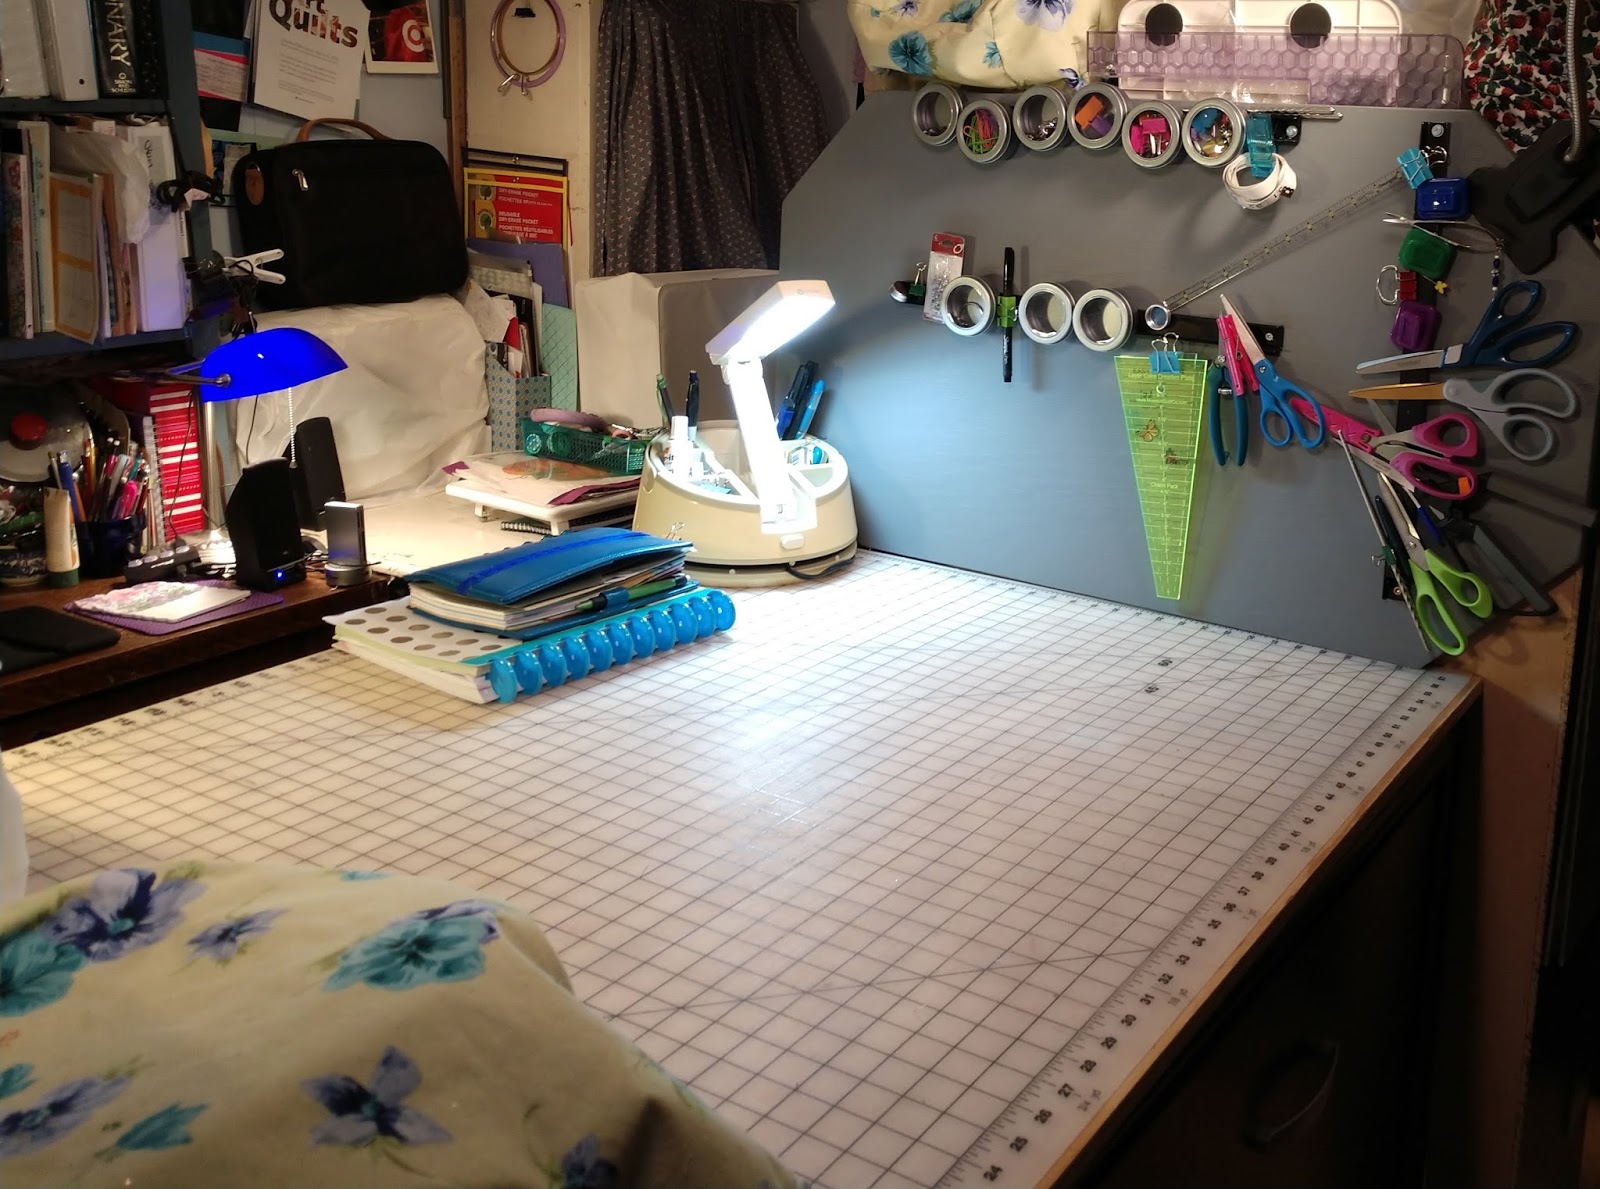
Next I straightened out the cutting area.  There was not much left once the thread was put away.  This is a huge cutting area given the amount of space that I have.  I absolutely love my large cutting table as I can easily cut out a dress pattern with a rotary cutter on it. As mentioned earlier, my last sewing studio spoiled me and I had some things I did not want to give up, this being one of them.


As of now  my embroidery machine shares one end of the table.  They play nice together and I move the embroidery machine when I need the full table.  The other end of the table is a piece of plywood with magnetic tool holders.  This helps me to keep the cutting area clear of my small tools and is backed with a small chest of drawers that holds patterns and sewing notions.  Several of my sewing machines are stored on top of this and another chest in the room.

Finally it was the sewing stations themselves that needed to be tackled.  Much just need to be stored in the proper place, perhaps a sign of an overbooked business owner.  Having the other areas cleaned motivated me to continue on until the space was usable again. I like to keep my machines covered to protect them from fading and dust.

This is my favorite sewing area.

The curtained book shelf on top the sewing station contains lots of my mixed media products that I like to use on my sewing and quilting projects.  And yes that is another machine behind the main machine.  It is a Sashiko machine and I trade them out as needed.  Believe it or not there is a second sewing area in the studio.


It is smaller and so I use it to piece tops and for small sewing projects.  This is where I like to use my serger so I keep my serger feet sorted in shoe storage pockets that hangs on the wall in this area.


If you looked carefully at my list, you probably noticed that I didn't get the walls painted behind the ironing station, nor did I get 10 years of content and patterns sorted.


It may take another deadline to get through it all.  However, I am inspired when I go into the studio now, and I cannot wait to see what I create next!


 Please check out my website www.LindaBrattenCreations.com.  There you can sign up for my free monthly newsletter, Linda B Creative and be sure to join my Facebook Group, Linda B Creative, where I share patterns, tips and techniques to inspire your creativity.

Also, be sure to hop on over and check the other creative individuals that are participating in the Spring Clean Your Studio Blog Hop 2018!

April 23 – Lori Crawley Kennedy – http://theinboxjaunt.com/
April 24 – Jennifer Thomas – http://curlicuecreations.blogspot.com
April 25 – Robin Koehler – http://nestlingsbyrobin.blogspot.com
April 26 – Andi Barney- https://www.andibarney.com/
April 27 – Misty Cole – http://www.mistycole.com/blog
April 28 – Carolina Moore- http://alwaysexpectmoore.com/
April 29 – Heather Pregger – https://heatherquilts.blogspot.com/
April 30 – Linda Bratten – https://lindabcreative.blogspot.com/
May 1 – Lisa Reber – dippydye.blogspot.com/
May 2 – Teresa Coates – http://www.crinkledreams.com
May 3 – Lisa Chin – http://www.lisachinartist.com/
May 4 – Jamie Fingal – http://www.jamiefingaldesigns.com/
May 5 – Sam Hunter – www.huntersdesignstudio.com
May 6 – Jessee Maloney – www.artschooldropout.net/blog
May 7 – Randa Parrish – http://www.sewartsyfartsy.com/
May 8 – Sarah Vedeler- https://meaningoflifedesigns.com/
May 9 – Jessica Darling – https://jessicakdarling.com/
May 10 – Melody Crust – http://www.melodycrust.com/
May 11 – Debby Brown – http://higheredhands.blogspot.com
May 12 – Cheryl Sleboda – http://blog.muppin.com


Thanks for stopping by, and feel free to leave a comment about what you liked in my sewing studio!-Linda