Showing posts with label Exploring Natural Machine-Quilting Motifs. Show all posts

Friday, January 10, 2020

28 Days to Better Free-Motion Quilting


I am so excited to let you know that today Bluprint has released a new program to help you develop your free-motion quilting skills on a domestic sewing machine. It is called 28 Days to Better Free-Motion Quilting. 


It is a four-week special event hosted by Angela Walters, featuring instruction from Bluprint's top quilters.  I am honored to let you know that I am one of the 11 instructors selected to participate in this event!


Photo taken from Bluprint Resources for the 28 Days to Better Free-Motion Quilting.

The first seven days will be focusing on simple designs to get you comfortable with free-motion quilting and build some skills to move onto more complex designs.


A Free-Motion Sampler created for classes I teach

Who doesn't enjoy lessons with a great workbook to download? Join in the fun by using my affiliate link by clicking here!


While you are there, check out my own Bluprint class that focuses on a variety of nature inspired quilting motifs.


Excited to be able to share this with you!

Saturday, November 19, 2016

Finishing Up the Craftsy T-Shirt Challenge


The next step in the process was to decide how I wanted to use this new fabric.  I searched my Pinterest page for some inspiration.  I also reviewed some of the classes that I have taught, since it would be easy to recreate something that you have all ready had success with.  I decided that I would use the t-shirt to create a jacket similar to one that I had previously taught using a sweat shirt as a base.

This is the sample from my sweatshirt/jacket class.
Instead of using a sweat shirt, I decided to create a quilted piece of fabric using the front and the back of the T-shirt.  Having worked with T-shirts and quilts, I knew that I needed to back the T-shirt pieces with a stabilizer before cutting them up.  So I fused No Show Mesh stabilizer by Floriani, to the back or wrong side of each of the T-shirt pieces.  I like to use No Show Mesh because it prevents the fabric from stretching out of shape, but allows the T-shirt to follow the shape of the quilting and not be ridged.

Next I straightened the edges of the pieces and decided what I wanted to do to increase the size of the T-shirt fabrics.  I would need  to increase the size of the piece to allow enough ease since the quilted fabric would respond like a woven instead of a knit fabric. I decided to use the peacock fabric in a color block manner that would appear on the sides of the jacket.  I also used the same fabric as a yoke on the top of each piece.  In addition, I pieced some 4-patch blocks to increase the width of the back piece.


Squaring up the T-Shirt Fabric

Inserting the 4-Patch blocks on the back
Adding side and yoke fabrics
Working on the front pieces
Then I created a quilt sandwich and free-motion quilted the front piece.  I used many of my Exploring Natural Machine-Quilting Motifs from the Craftsy class that I teach.  Can you identify any?
Using my Nature Inspired Quilting Motifs to create new fabric!
 Keeping an eye on the clock I knew that I was also challenged by the deadline.  So I examined what remained to be done and the remaining amount of time.

At this point, I decided that I needed to change to a project that could be completed in a shorter amount of time using what I had all ready completed.  So I scoped out my studio, and found a great peacock zipper.  This inspired me to decided to create a zippered pouch!  Something that I could complete in the remaining time.  So I squared up my quilted piece, and got my serger ready to go!

The Quilted Piece with the Peacock Zipper
 I loaded the upper loopers of my serger with a black wooly nylon thread and the lower looper with a black serger thread.  I used black serger thread in both needles and set the machine up for a 4 thread overlock stitch. I plan on folding the quilted piece in half to create the bag.  Since the zipper
is decorative, I am planning to showcase it by sewing an exposed zipper in the bag.  Thus I serged both top edges of the bag to finish off the raw edges.
The serged top edge of the bag.
Next I went to my sewing machine to attach the zipper.  I created end pieces for the zipper by taking a piece of fabric 2" x the width of the zipper.  I pressed the fabric in half so it measured 1" x width of zipper.

Then I pressed the raw edges to meet at the center fold.


I then put the stop end of the zipper in to the end piece and stitch the open end closed.

Inserting the Zipper into the End Piece
Sewing the End Piece Closed


Measure the edge of the bag that the zipper will go on, and trim the zipper 1" less than that measurement.  Then sew the other end piece on the other end of the zipper.

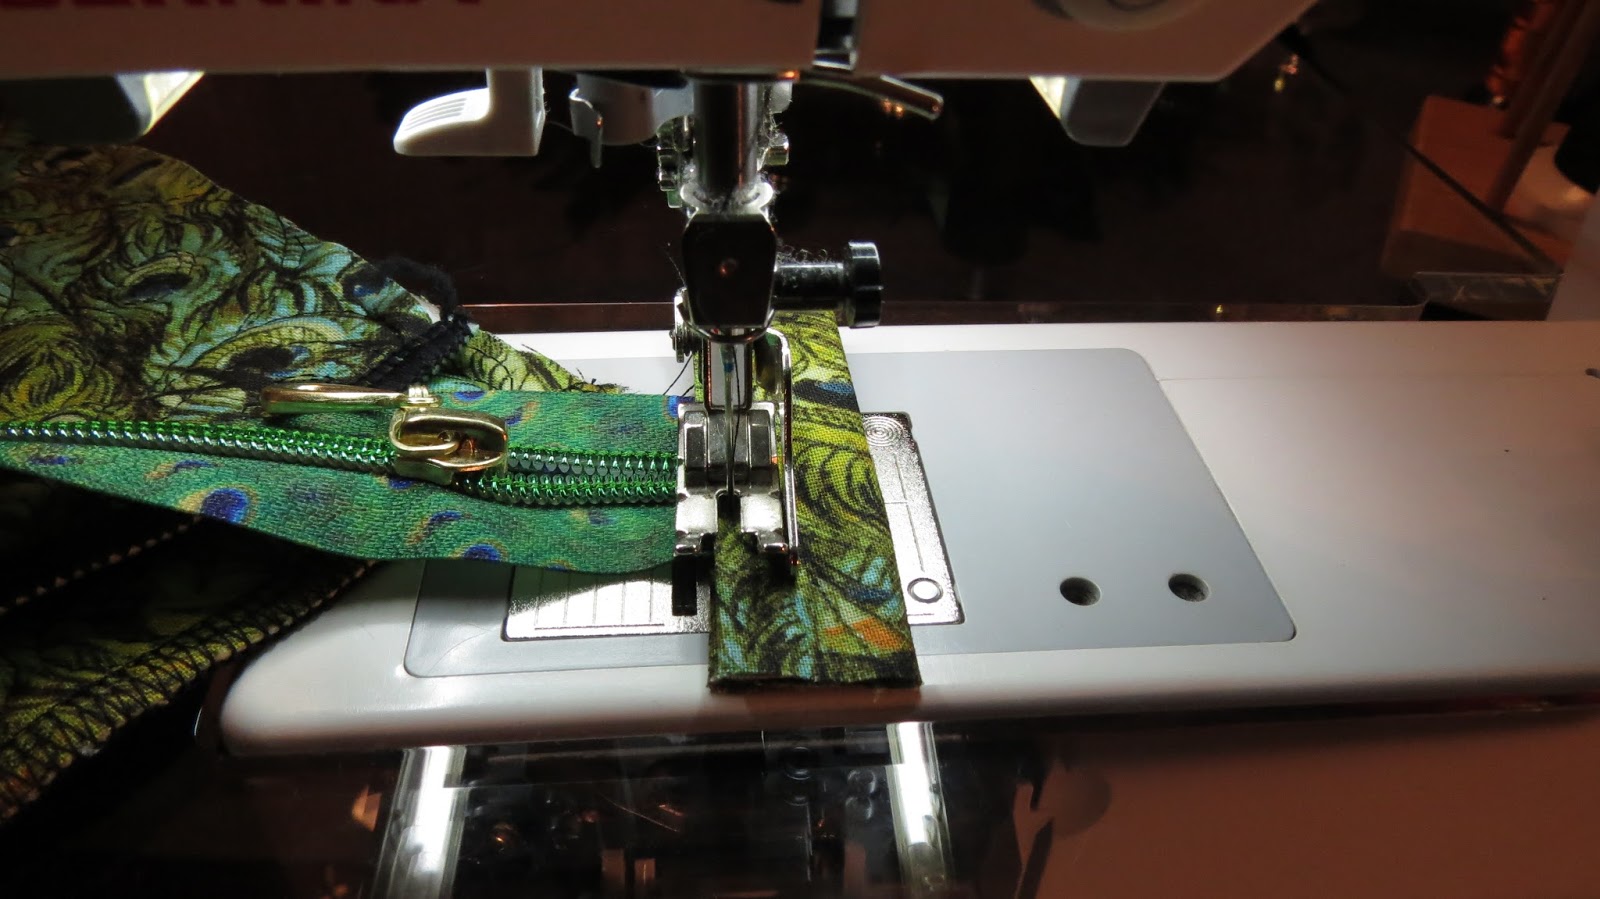
Next place the outside edge of the zipper on the edge of the serger stitches.  Sew the zipper on one side of the bag.  To make this easier unzip the zipper and sew down a portion of the zipper.  Then insert the needle into the zipper and lift the presser foot.  Zip up the zipper, pulling the zipper pull behind the presser foot.  Lower the presser foot and continue stitching the zipper to the top of the bag.

Stitching the zipper on the right side of the bag's edge.


Pull the zipper pull behind the presser foot and continue sewing.

To sew the other side of the zipper you will need to bring the unsewn, right side edge under the unsewn zipper edge.  This will create a tube in which the wrong side of the bag will be on the outside of the tube.  Sew down the unsewn edge of the zipper to the right side of bag in the same manner as the first side.

Sewing in the tube to attach the other side of the zipper.
Next unzip the zipper so when we create the bag we can turn it inside out.  Now with the wrong side of the bag still on the outside of the tube,  place the zipper at the top and flatten the bag to find the center opposite of the zipper. Take the center and push it into the bag about 1" on each side of the center.  This will create a "W" on the bottom of the bag to create depth for the bag.

Looking at the edge of the bag to see the "W" to create depth.
Place a pin parallel and 1" away from the raw edge to hold the "W" in place.  You place the pin there so it never comes in contact with the blade of the serger.

Where to place your pins when serging.
Create a "W" on the other side of the center of the bag. 

Then turn off your serger blade.  It is best not to use a blade when serging around zippers.  Using the same threads and settings, serge down each side. Use a small amount of Fray Block to seal the beginning and ending stitches.  Let the Fray Block dry then trim away the excess tails.

Serged inside seam of the bag.
Turn your bag right side out and enjoy!  I plan on using mine when I travel and do presentations to carry my necessary techie supplies like tablets, hard drives, pointers and adapters. 

Finished bag!
Back side of the bag.
Zipper on the bag
Just to let you know, I sent my photos of the completed bag in before the deadline.  However, I was too tired to share the process with you here till now.  Have you ever created under pressure?  Or changed sewing projects to meet a deadline?  I would love to hear about your sewing adventures.
Sew Long!  -Linda
Sunday, December 13, 2015

There is Still Time Left!

You can still enter to win my Craftsy Class Exploring Natural Machine-Quilting Motifs! To motivate you to enter, check out what individuals have to say about my class:


Reviews of this Class

Average Review (of 5 reviews)
Reviewer Avatar

Excellent Really Enjoyed This Class  November 28, 2015

HappiestSpinning
Linda's quilts are amazing - and so is this class. Starting with simple shapes and working up to beautiful nature inspired motifs, Linda makes you believe that you are in with a chance of achieving similar results. Well, we shall see - but it's been really fun trying!
A lovely class Linda, and you are a great tutor. Thank you.
Reviewer Avatar

Excellent I loved this class  November 5, 2015

Chantal.C
Another way to quilt with hearts, leaves, vegetables, flowers, shells etc... These quilting designs can even be used as embroideries. All the technique is very easy to follow and open other doors for a different quilting way. Very interesting class. Thank you Linda.
Reviewer Avatar

Excellent Linda's Great! Love This class!  October 12, 2015

tlmiam1
Very fun and inspirational.
Reviewer Avatar

Excellent Easy to understand, great details!  October 6, 2015

SewEasyQuilter
Love the way Linda starts out with basic shapes and then expands on them with more easy shapes to create designs that look difficult, but aren't! Also love the way she sketches them out before going to the machine, so it is really easy to follow along. I'm not a freestyle artist, but with Linda's class, these motifs seem attainable. Thanks, Linda!
Reviewer Avatar

Excellent Brilliant nature motifs  October 4, 2015

Denise S
Brilliant. This is one of the best of the many Craftsy classes I have taken. Linda uses variations on simple shapes to create detailed realistic looking nature motifs. Linda has the ability to break this down to a simple process and to execute the designs on a domestic sewing machine. A soothing well modulated voice, and a natural teaching style, including how to correct errors made this a pleasure to watch.


So don't delay!  Instructions on how to enter can be found here.  Thanks, Linda

Wednesday, December 9, 2015

It is Give Away Time!


Who would be interested in getting my Craftsy class, Exploring Natural Machine-Quilting Motifs for free?  


All you have to do is leave a comment on this blog post, and follow my blog.  To follow my blog, just click on the "Join this Site", found on the lower right side of my blog, and enter your information in the section .  Then you will be informed when I post something new on the blog.

This is what you are looking for!

To comment, just go to the end of this post and leave me a note.  That’s it and you will be entered into the drawing to get my class.  Tell your quilting friends and family about this opportunity!  
 
Look for this at the bottom of the post to leave a comment!
I will close the opportunity at 12:00 a.m. CST on Wednesday, December 16th, 2015, and will announce the winner later that day.

I also want to let you know that from now until December 12th Craftsy is offering extra special savings.  This is a great time to give yourself a gift!  Use this Craftsy link to find those special deals.

Don’t forget to comment and sign up for future posts, along with a chance to get my class, Exploring Natural Machine-Quilting Motifs!--Linda

Saturday, September 5, 2015

And the Winner is. . .

Congratulations to Candy Corn Stap!  You will be receiving an email from me with the information to redeem your free class.

Everyone else can check out my Craftsy class at Exploring Natural Machine-Quilting Motifs!
 
Have fun free-motion quilting motifs inspired by nature! Linda

Friday, August 28, 2015

My First Online Craftsy Class


This summer I was able to work with Craftsy to create a free-motion machine quilting class, which is soon to be released!  I thought you might be interested in seeing some behind the scenes photos of what my experience was like.

When I arrived on Wednesday, I was shown to my dressing room, and given a tour of where I would be filming. 

Next I was off to meet with Danica, my Make-up Artist.  She has a great set of brushes that I envied!  I think she did a great job making me camera ready!

Then it was on to the set! 


It was fun to learn what is involved in creating an online class, but I had a great team to guide me along.
It was super fun working with Chelsea, Jeff and Tony.

After taping, the evenings were mine to explore downtown Denver, CO.  I found some great places that I want to go back and visit again.

A special thanks to, Erin, Becky and Greg, who worked with me prior to filming to make the whole process go so smoothly.  It was a great experience and I would do it again! 

In case you are not familiar with Craftsy, they are the fastest growing crafty community on the web with over 5 million members in over 200 countries worldwide.  With a Craftsy online class you can take it as many times as you want, whenever you want and access never expires.


Even though the class is not yet available online, I am able to give one class away for free.  So let’s get you started… click the link below the photo to sign up for an opportunity to win my Craftsy class!!
Unfortunately the drawing has ended, but click here to learn about my class!


Be sure to act quickly, your chance to enter will end at midnight, Central Standard Time, September 3, 2015.  The winner will be announced on my social media sites.  

On Facebook at: Linda Bratten Creations
on Pinterest at: Linda Bratten Creations
on Instagram at: Linda_Bratten
and on Twitter at: LindaBratten 


May your bobbins be full, Linda